
The modern wellness space is evolving—and as a yoga teacher, simply showing up on social media isn’t enough anymore.
If you’re juggling class schedules, answering DMs, and trying to fill workshops while still holding space for your students, it’s easy to feel stretched thin.
That’s where having your own website comes in—not as another task on your list, but as a supportive structure that helps your business flow.
Whether you teach weekly classes, offer meditation or breathwork, or host retreats, a personal website becomes your online sanctuary. It’s the space where your philosophy lives, your offerings are clearly laid out, and potential clients can find and book you with ease.
Still, we get it—building a personal website can feel overwhelming, especially if tech isn’t your zone.
But here’s the truth: building a site that reflects your unique teaching style and attracts the right audience doesn’t require coding skills or a design degree. With the right approach, you can create a digital home that not only showcases your expertise but also strengthens your business and community.
This guide will walk you through the process step by step, ensuring that your website is both beautiful and functional—one that resonates with your students and invites them to explore your world of wellness.
Brought to you by:
Try TheFlowOps for free
Join wellness entrepreneurs like you who’ve ditched the tech headache — and now run their website, classes, emails, and bookings all in one flow.
Step 1: Define Your Purpose and Personal Brand
Before diving into the technical aspects, take time to define the purpose of your website.
What do you want visitors to do? Whether your goal is to book more private sessions, sell online courses, or share wellness content, having clarity will shape your site’s structure and design.
Crafting Your Brand Identity
Your website is an extension of your practice, so it should reflect your unique energy and approach. Ask yourself:
- What makes my teaching style different? Do you specialize in gentle yoga, prenatal yoga, or breathwork?
- How do I want visitors to feel? Should they experience a sense of calm, empowerment, or healing?
- What colors, fonts, and imagery align with my brand? Soft, neutral palettes may suit a restorative practice, while vibrant hues can complement an energetic flow.
Your brand identity should be consistent across your logo, visuals, and messaging to create a cohesive experience.
Step 2: Choose the Right Website Platform

Fortunately, you don’t need advanced tech skills to create a professional website. Website builders simplify the process, allowing you to focus on design and content rather than coding.
Best Platforms for Yoga and Wellness Websites:
- WordPress – Highly customizable with endless plugins for booking, blogging, and e-commerce.
- Squarespace – Beautiful, minimalist templates that are easy to edit.
- Wix – Intuitive drag-and-drop features for design flexibility.
- TheFlowOps – Specifically designed for Yoga teachers, allows you to create a website in a much efficient way.
For beginners, Squarespace or Wix offer the easiest setup, while TheFlowOps is better for those seeking a yoga and wellness-niche web builder.
Step 3: Secure a Domain Name and Hosting
Your domain name is your website’s address (e.g., www.youryoganame.com). Choose one that is:
- Short and memorable
- Reflective of your brand (e.g., www.flowingwithgrace.com)
- Free of numbers or hyphens for clarity
If you use Squarespace or Wix, hosting is included. For WordPress, you’ll need to purchase hosting separately from providers like SiteGround, Bluehost, or Kinsta.
Step 4: Design an Intuitive and Inviting Layout

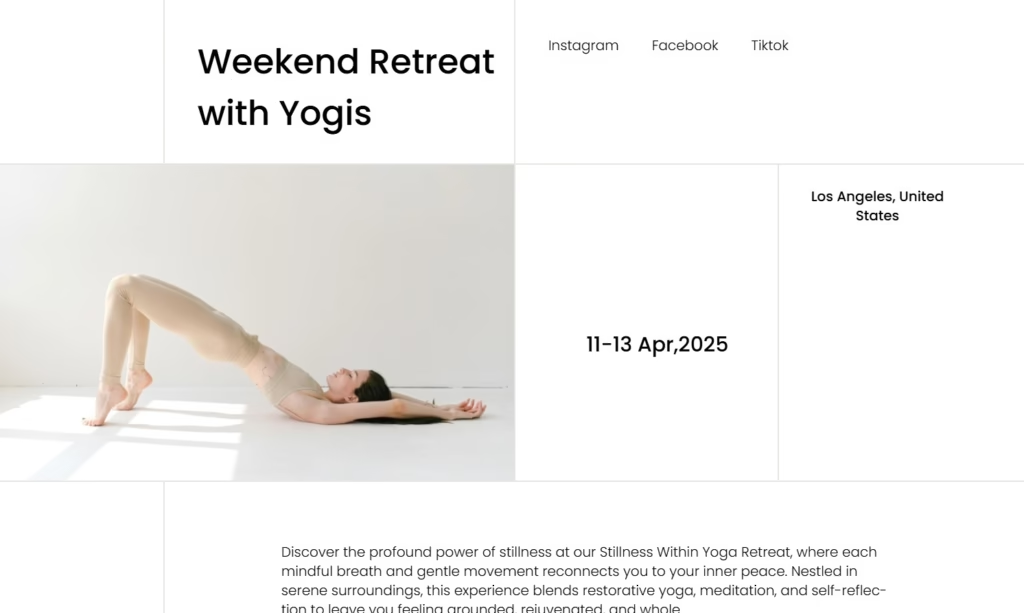
Your website should feel like a welcoming space, guiding visitors effortlessly to what they need. Start by choosing a template that best fits your brand—whether it’s minimalist, vibrant, or highly interactive.
Essential Pages to Include:
- Home Page – Your first impression. Feature a welcoming image, a brief introduction, and easy navigation.
- About Page – Share your journey, philosophy, and what inspires your practice.
- Services/Offerings Page – Detail your classes, workshops, and wellness services with clear descriptions and booking options.
- Blog/Resources Page – A space to share insights on yoga, mindfulness, and holistic well-being, boosting Search Engine Optimization (SEO) and engagement.
- Contact Page – Make it easy for visitors to reach you with a form, email, and social media links.
If you offer online bookings, integrate scheduling tools like Acuity, Calendly, Momoyoga or TheFlowOps Scheduler to automate reservations.
TheFlowOps simplifies the process with pre-designed templates tailored for wellness entrepreneurs—helping you create a professional, functional website from the start.
Step 5: Build Trust with Testimonials
People feel more confident booking with someone who has positive reviews. Showcase testimonials from students and clients to add credibility.
Best Places to Feature Testimonials:
- Home page (highlighted quotes)
- Services page (detailed feedback)
- Dedicated testimonials section
If you’re just starting, ask past students for feedback and permission to share their words
Step 6: Connect Your Social Media and Email List
Your website should integrate smoothly with your online presence. Embed your Instagram feed and provide links to your social media pages.
Email Marketing for Wellness Professionals
Building an email list keeps you connected with your audience. Offer a freebie (e.g., “Download My 5-Minute Morning Meditation”) in exchange for sign-ups. Platforms like MailChimp, ConvertKit, or Flodesk make email management simple.
Step 7: Launch and Promote Your Website
Once your website is live, it’s time to share it with the world!
Ways to Promote Your Yoga or Wellness Website:
- Announce your launch on Instagram, Facebook, and LinkedIn.
- Improve SEO by regularly adding valuable blog posts.
- Encourage students and clients to share your website.
- Partner with other wellness professionals through guest posts or collaborations.
- Offer an exclusive discount on a class or session for website visitors.
- Add your website to your Google Business Profile so potential clients can easily find and learn more about your studio.
With consistent promotion, your website will become a powerful tool to attract and engage your ideal audience.
Create Your Website in Just a Few Steps—No Coding Required
When we were building TheFlowOps Web Builder, we spoke with yoga teachers who had spent 48+ hours trying to build their websites—getting stuck with complicated platforms, endless plugins, and templates that just didn’t feel aligned.
So we designed something better. Something built for wellness practitioners like you, with clarity, ease, and flow at the center.

Here’s how simple it is to get started:
- Create an account – It’s free to begin and only takes a minute.
- Choose a template – Select from free and premium templates in our marketplace, all thoughtfully designed for yoga teachers, coaches, and retreat hosts.
- Customize the fields – Add your details using our intuitive, form-based editor—no coding, no design skills needed.
- Hit publish – Launch your site with a single click and start sharing your work online immediately.
No coding. No stress. Just a clean, beautiful website that helps you focus on what really matters—your practice and your students.
Not Ready for a Full Website? Start with a Scheduler.
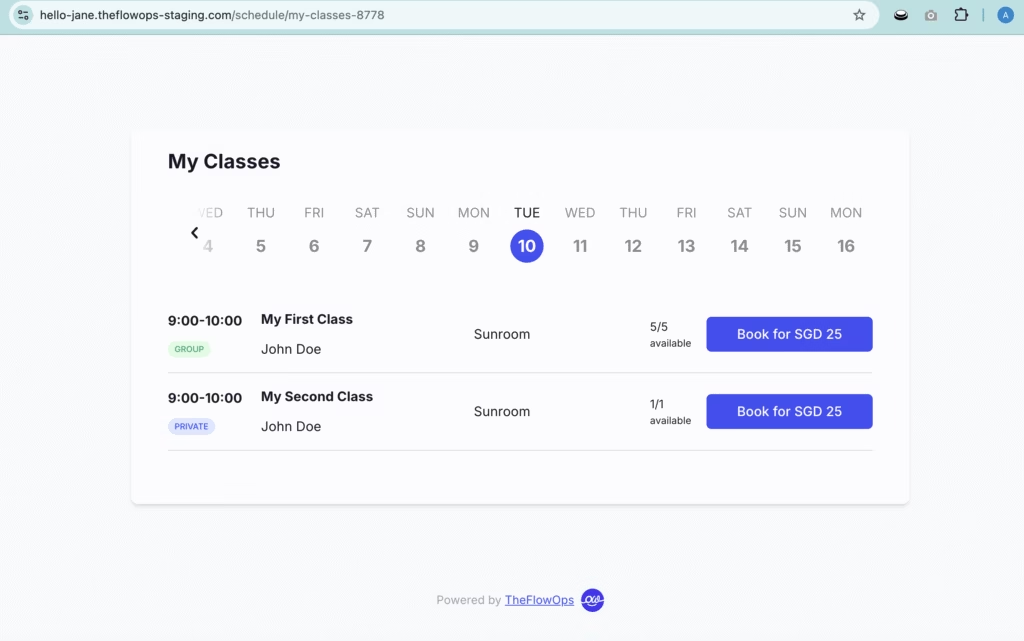
If building a full website feels like too big a leap right now, consider starting with a visual scheduler.
It’s a simple but powerful tool that allows students to view your availability, book sessions, and even pay—without the back-and-forth messaging or missed opportunities.
For yoga teachers who are just starting out or already have a site built elsewhere (like Wix or Squarespace), adding a scheduler can immediately make your business feel more professional and less chaotic.
There are plenty of scheduling tools available—like Acuity or Calendly—but if you’re looking for one designed with wellness in mind, TheFlowOps Scheduler makes things refreshingly easy.
With built-in support for recurring sessions, waitlists, and direct payments, it works beautifully on its own—or integrates seamlessly into your personal website when you’re ready to expand.
Best of all?
You’ll get a unique booking link you can share anywhere—your Instagram bio, Substack button, or LinkedIn profile. It automatically updates as your availability changes and lets clients book up to two weeks in advance. Just copy, paste, and let the bookings roll in.
Sometimes, simplicity is the best first step—and a scheduler can be the bridge between where you are and the business you’re ready to grow.
Your Digital Sanctuary Awaits

Your website isn’t just a place to showcase your offerings—it’s an extension of your practice, a reflection of your journey, and a bridge connecting you with those seeking guidance. With a little intention and creativity, you can craft a space that welcomes students, inspires trust, and grows alongside your teaching.
The best part?
Like yoga itself, your website is always evolving. Start where you are, refine as you grow, and let your digital presence flow as naturally as your practice.
If you offer movement-based services like fitness coaching or personal training, you’ll also want to check out our guide on fitness trainer websites that convert—it covers 5 must-have elements to turn casual visitors into committed clients
For more insights on mindful business and wellness strategies, visit journal.theflowops.com—your space for balance, inspiration, and success.